How to Import Contacts into Outlook? {Updated Guide 2022}
There are many reasons why you want to transfer the contact data stored in a database or spreadsheet into Outlook. Maybe you have an external list of contacts or migrating from another mail server, or perhaps setting up a new contact. Whatever the reason, luckily Outlook proposes smooth and quick ways of how to import contacts into Outlook.
After successfully importing the contacts, you will have access to all your email contacts in one place. Furthermore, you cannot use the mobile app to import contacts to your Outlook address book. You have to export your contacts to a CSV (comma-separated value) file or you can create a new one.
The post will show you how to effortlessly import contacts from the CSV file to an Outlook account. So, keep reading to learn!
Also Check:- How to update Outlook
How to Import Contacts into Outlook?
Microsoft Outlook usually has two file types PST and CSV from which you can directly Import Contacts Into Outlook. But before starting importing, you have to prepare contacts in an accurate manner. Here’s how:
PST (Personal Storage Table): It’s a unique file format for storing data in Outlook, Exchange Client, and other Microsoft software. However, in a .pst file, contacts are already in the right format. So, there is no need for any additional modification in it in a way to import.
CSV (Comma Separated Values): If you store contact details in Excel or a spreadsheet, they will be in a .csv file and need a few adjustments. Even if you export your contacts from another email service like Gmail or Yahoo, then an amendment is also required. Here’s what to modify:
- Export Contacts into CSV UTF-8:- If contact details have some characters that do not exist in the English alphabet, they should be imported correctly. To prevent possible issues, export contacts into a CSV UTF-8 file if this option is available otherwise convert CSV to UTF-8.
- CSV Values should be separated:- Apart from this alteration, make sure the values in your CSV file are separated by commas. A different list separator is set by default according to your settings. For example, in many European countries, the default list separator is the semicolon. But Outlook only supports the comma, so make sure you replace semicolons with commas before importing the CSV file into Outlook.
Import Contacts into Outlook from CSV or PST File
With the help of the Import/Export wizard, you can frequently import your contacts into Outlook. In the below section, we will walk you through the stepwise guidelines. So, look at here:
1. Import Contact into Outlook from CSV File
Carry out the following noted steps to Import CSV Contacts Into Outlook:
- First, open the Microsoft Outlook program on your Windows.
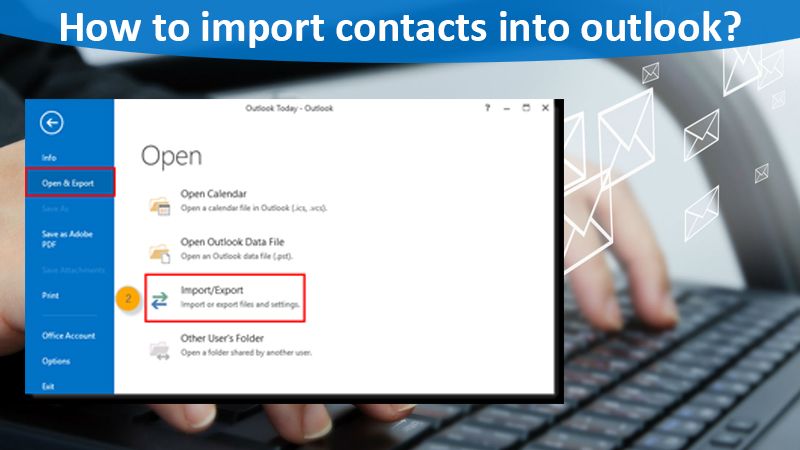
- Now, go to the “File” menu placed at the top-left corner.
- Next, navigate to “Open & Export” > “Import/Export”.
- Doing so the Import and Export Wizard starts. From the given list, select “Import from another program or file” and then click “Next”.
- Under Import CSV Contacts Into Outlook, select the “Comma Separated Value” option and then hit the “Next” button.
- After doing so the “Import a File” box shows on the display screen. In this section, first, select the file to import by clicking on the “Browse” option and finding your .csv file. Once you search for it, place a double-tap on that file.
- Afterward, choose one of the following to specify how you want to handle duplicate contacts:
Steps to Handle Duplicate Contacts
1. Replace Duplicates with Items Imported
If a contact is in your Outlook and your contacts file, then Outlook automatically discards the info from your contacts file. Choose this option if the information in your .csv file is more complete or more up-to-date than the info in Outlook.
2. Allow Duplicates to be Created
If contact info is in Outlook and your .csv file, Outlook creates duplicate contacts. One with the original Outlook info and another one with the info imported from your contacts file. You can combine the details in one single item. This is the default option and you can select it if you don’t want to lose a single bit of detail.
3. Do not Import Duplicate Items
You can select this option only when you want to import new contacts and leave all existing contacts together.
- Once you select the option, click the “Next” button.
- In the next step, select the “Contacts” folder and press “Next”.
- Afterward, place click on the “Finish” tab.
- Outlook will then start importing your contacts. Once the process gets done, the Import Progress box closes.
- To ensure all your contacts successfully import in Outlook; click the People icon on the Navigation bar.
2. Import Contact into Outlook from PST File
In some conditions, you may want to Import Gmail Contacts Into Outlook from the PST file rather than CSV. It especially requires to do so when:
- Firstly, you have to transfer contacts from one Outlook account to another.
- Then move contacts from one computer to another.
- Although if you want to transfer all Outlook items such as emails, contacts, appointments, and tasks in one single frame.
Here are the beneficial instructions to do the same:
- In Outlook, go to the “File” menu.
- Now, select Open & Export > Import/Export.
- Then, select “Import from another program or file” and click “Next”.
- Select the “Outlook Data File (.pst)” option and then press the “Next” button.
- Place a single tap on the “Browse” button and select the .pst file that you want to import.
- Now, from the given option, choose the one on how to deal with duplicate items.
- Then, press the “Next” button.
- If your .pst file is protected with a password, Outlook will ask to provide it.
- This is the key step for importing contacts accurately, so make sure you are doing it right:
- Under the “Select the folder to import from” section, select “Outlook Data File” to expand it, and choose the subfolder “Contacts”.
- If the target account/mailbox is currently selected, you can choose the “Import items into the current folder” option. Otherwise, select the “Import items into the same folder in” option.
- After that, choose the mailbox or Outlook Data File into which the contacts have to be imported.
-
- Once done, click “Finish”.
- Outlook will then start importing the contacts instantly. When the progress box closes, it means the contacts have been imported into Outlook.
Final Words
Aren’t you satisfied with the answer to the query How To Import Contacts Into Outlook? Still, looking for quality technical assistance? If really so, then you can directly contact our Outlook Technical Support experts. We are talented tech specialists working hard day to night at the helpline number to support you.