How can I schedule Outlook email for delayed delivery?
Would you like to schedule email Outlook, and send it later? Congratulations! You can do this by making some simple settings in your Outlook account. Most of the time, users like to schedule their email if they are not available to send them at some specific time. Or particularly when the recipient is available to read that email. This boosts up the response rate of Outlook email services. But, How to schedule an email in outlook? In this post, we are sharing some simple and easy guidelines. Let’s have a look.
How do I schedule email outlook 365?
There are two ways to schedule email Outlook. One is the traditional method, while the other is the professional method. The traditional method is accomplished using Microsoft Outlook basics. Below we are going to share the steps for the traditional method. If you have any doubt or confusion regarding the method, you can always contact the Outlook email support team and get instant help to clear all the doubts.
Traditional method
The traditional method for “Outlook schedule email” has been named ” Outlook delay delivery”. The entire scheduling process is managed through the outlook desktop application. Here are the steps to schedule email Outlook 365, MS Outlook 2013, and MS Outlook 2016 using the traditional method:
- Open the ” MS Outlook”.
- Now, press the ” new email” button. You could find this button on the left side of the Outlook ribbon. When you hit the button, the new compose box window will appear.
- In the ” two-section”, add a recipient email address. If you want, you can also add the multiple recipients using the “CC” and ” BCC” fields.
- Once you have entered the recipient address, write a subject for the email followed by the ” message body”.
- Begin the scheduling process. Hit the ” option” button from the MS Outlook ribbon.
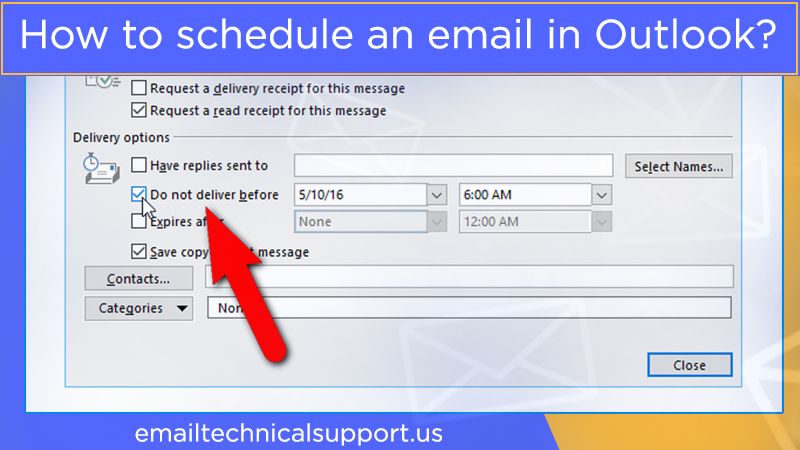
- Hit the ” delay delivery” option, and you will get access to email scheduling functionalities.
- A pop-up screen will appear. Here, you have to click the delivery” option, choose the “date and time”.
- Close the popup screen, and you will be directed to the compose box.
- Here, click the ” send” button to schedule email Outlook. Once you have scheduled the email, it will be saved in the ” Outlook” folder.
- The email will be sent as per the decided time.
So, this is how to schedule an email in outlook 365. If you’re having trouble because of any of the above-mentioned factors, you must contact the Outlook Email Support team for help. The email professionals can help you to schedule the email and overcome the problems that you may face in between the process.
Points to keeps in mind
Although Outlook schedule email using the traditional method above is easy. However, there are certain factors that must take care of for email delivery:
- Do not turn off your system during the scheduled delivery time.
- The internet connection must be active in working fine.
- The outlook must be synchronized with your system’s date and time.
- The date and time should be running properly.
Steps to perform Outlook schedule email
If you want to schedule and email using your Outlook app and send it later, you can proceed with the step-by-step guidelines mentioned below:
- Go to the “Outlook” application on your device.
- On the app, click the ” new email” button.
- Compose the email to send.
- Check the ” options” tab.
- Now you need to click on the ” delay delivery” button. You can find this button under the more options.
- Choose the ” delivery” options.
- Tap on the ” Do not deliver before” option.
- Choose the ” date and time” to send the email. Save the settings.
- Click on the close button.
- At last, choose the “send” button.
Once you are done with instructions, your message gets saved in the Outlook application and will be sent automatically later according to the time and date settings you have made. So, this is how you can schedule Outlook email using the application and send it later to anyone you want automatically. Use the desktop version of the Outlook application and change email delivery settings today as per your preference.
How to schedule an email in Outlook Mac?
If you want to delay the email delivery in Outlook for Mac, proceed with the steps below:
- First, click ” new email”.
- Then provide the details in the mentioned field. Make sure that you enter the correct information.
- Choose the ” down arrow” present next to the send button.
- Click the ” send later” option.
- Choose ” date and time” using the drop-down menu, you have to set the time and date as per your preferences to send an email.
- Hit the ” send” button.
After this, all the emails will be sent automatically later according to the timing you have mentioned. Do not forget to complete the ” delay delivery” as the final step for sending the emails automatically.
See also- How to forward emails from Outlook?
Wrapping up
However, the above steps of how to schedule an email in Outlook are simple and easy. You just need to proceed with the guidelines in a sequence. And you can set the email for later delivery by modifying the email settings. But, if you are still having some doubts, or there is any other technical trouble with your Outlook account, you can also contact the Outlook Email Support team for help. Just write down any email highlighting your concern and send it to the experts. Although, the professionals will immediately contact you and suggest the best possible solution to fix the issue.