How To Settle Outlook Autocomplete Not Working Issue?
When you compose an email in Outlook to a new recipient for the first time, you enter the subject, cc, to, bcc, and recipient address. But, again, composing the email to the same recipient, you can see the complete email address in the suggesting box when you are typing the email initials. This is due to the Outlook Autocomplete feature. It makes the composition of emails very easy, and you don’t have to enter the email address and others again and again. But, sometimes, due to some technical glitches, the “Outlook Autocomplete not working” issue user experiences.
If you have the same problem, then don’t worry; we have your back. We will provide you with the best practices that you can perform to fix the issue. But, don’t you want to know why this AutoComplete not working in Outlook. If Yes, then follow the next section.
Also Read: Why Outlook email not working
Why is Outlook Autocomplete Not Working?
We talked with the experts about Outlook Autocomplete stopped working issue; they said this issue occurs:
- When Autocomplete is not enabled in Outlook.
- Due to corrupted Outlook PST files.
- Cached folders can be the reason.
- When the Outlook profile is damaged or corrupted.
These are the signs that prevent Autocomplete from working. Now let’s move to the solutions that would help you fix this issue.
Steps to Perform When Outlook Autocomplete Not Working
From the users’ feedback, most users said that this issue mainly occurs in Outlook 2010 64-bit (Exchange 2010, Windows 10v. 1703). Ins some cases, the suggestion are not popping up while composing the emails. To fix this issue, you can perform the given solutions.
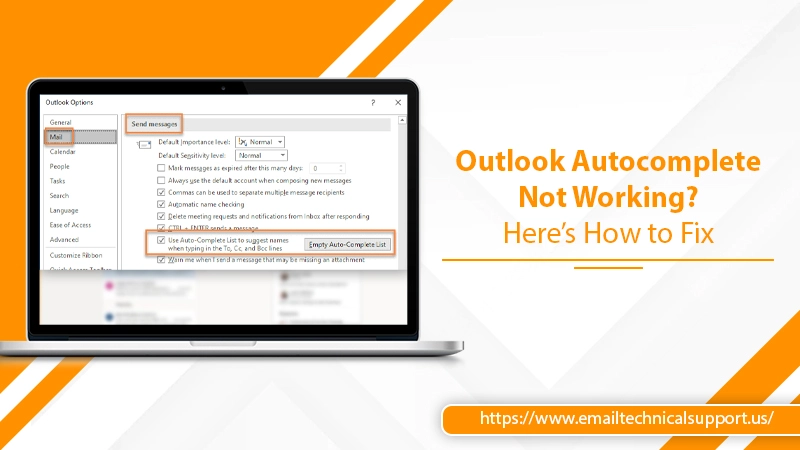
Solution 1: Check Autocomplete is Enable
Autocomplete is a feature in Outlook that should be enabled. If it is not enabled, then your Autocomplete not working correctly. Make sure that the autocomplete is enabled with the following steps: All you have to do is,
- Start the Outlook application and navigate to the File.
- Now, click on the Options tab and choose the Mail option.
- Later, scroll down for a while to reach Send Messages section.
- If the checkbox “Auto-Complete List suggests names when typing the To, cc, and BCC lines” is not selected, mark the checkbox.
- Click on the OK button.
- Restart the application and check for Outlook Autocomplete not working issue by sending an email.
Solution 2: Clear Autocomplete List
Outlook autosaves the email entries up to 1000, and it will not save any new email address when it exceeds the limit, even if you are sending the email to the same recipient. So to fix the Autocomplete issue, you must clear the entires list and follow the 1- 4 steps from solution 1. After reaching the page, click on Empty Autocomplete List and then click Yes to confirm. Your list will now empty, and you must enter the emails again.
Note: Clearing the list, delete all the email addresses from the past.
Solution 3: Turn OFF Add-ins When Outlook AutoComplete Not Working
Some of the Add-ins create this issue. Mainly it triggers by the Outlook Change Notifier add-ins installed by iTunes. Disabling all Add-ins along with iTunes add-ins can fix the problem. You have to follow the steps:
- Firstly, go to the File and pick the Options tab to reach the Outlook Options window.
- Now, select Add-ins.
- From the Manage drop-down menu, select COM Add-ins.
- Click on the Go button to proceed.
- After that, unmark the add-ins checkboxes to disable them.
- Lastly, click on the OK button.
Solution 4: Run Outlook in Safe Mode
If, after disabling the Add-ins, you can’t fix the Outlook Autocomplete not working issue, then you should perform to open the Outlook in safe mode. It will open Outlook without any bugs or problems, which can prevent Outlook from performing. Here’s how
- Press the Windows+R keys to access the Run window.
- Now, type outlook.exe/safe in the Run box and press the Enter button.
- Now your Outlook will launch without any add-ins.
Solution 5: Rename RoamCache to Reset Autocomplete
The RoamCache folder stores the Autocomplete cache. You can reset the Autocomplete cache by renaming the RoamCache folder to fix the Outlook Autocomplete not working issue with the help of given following steps:
Note: You lose all email addresses saved in Autocomplete by renaming the RoamCache folder.
- Start the Outlook application and choose the File option.
- Then, click on Info and choose the Account Settings tab.
- Now, the Account Settings windows will appear; if it shows Microsoft Exchange (under Type), use the Microsoft Exchange Server account section.
- Exit the Outlook.
- After that, we need to locate the Outlook folder.
- To find it, click on start and paste %LOCALAPPDATA%\Microsoft\Outlook in the search box.
- Then, choose the Outlook folder shown on the top.
- Now, right-click on the RoamCache folder and choose Rename option. Change the folder name to old_RoamCache.
- After this, open the Outlook application again; it will create a new RoamCache folder.
Solution 6: Create a New Outlook Profile
A profile is essential as it consists of the data files, accounts, and settings that define where your emails are stored. When the Outlook Autocomplete not working, it can be due to a corrupted profile. To fix it, create a new Outlook profile with the given steps:
- Open the Outlook program and go to the File option.
- Now, choose Account Settings, followed by the Manage Profiles tab.
- After that, you have to pick the option of Show Profile and then click on Add.
- Later, enter a name for the profile in the Profile Name box. Click OK.
- Now, configure the new profile with your Outlook email account.
- Click on Finish.
Also Read, Why: Outlook stuck on loading profile
The Bottom Line
The Autocomplete feature of Outlook makes our work easy in recalling the email address just by typing. When the Outlook Autocomplete not working, our work of entering the complete email address with to, cc, and bcc will increase. So, to overcome this situation, you can follow the above-stated solutions. These are the most straightforward approaches that you, even a new user, also perform. If somehow, you experience the same issue even after following the methods, then contact our Outlook Support Experts to get an explicable process.